My Design Process | Surveying
After our initial new client meeting (read all about that here), typically the next step will be surveying. Sometimes this even happens at our first meeting, if we are sure we’re going to work together or if the location is far from my home base. Surveying is the act of measuring the spaces we’ll be working with to create a floor plan.

A condo I surveyed for renovations. We’ll use this example for the whole post.
Proper Measuring and Why It’s Important
I find that most people do not expect this to be a part of the interior design process, however, it is the most crucial step. The measurements have to be exact in order for us to successfully execute the design. If there is an architect or contractor involved prior to the interior designer, this step may have already been completed by one of them. I like to double check when I can, just to be sure.
In a full renovation project I’m currently working on, both the architect and the kitchen contractor failed to measure the ceiling height in the kitchen. The entire kitchen was designed around a 9’ ceiling height (which is the height from the architect’s drawings). We were about to order the cabinets when the kitchen contractor realized the mistake. We ended up with ceilings that were less than 8’ high. That is a huge difference. The cabinet design had to be reworked and it looked bad.
The clients ended up deciding to move forward with a different kitchen provider. After all of the chaos they felt the one we were working with simply could not adapt the design in a way they were happy with. Had the cabinets been ordered and arrived on site where they would not fit, I can’t imagine the time and money that would be wasted trying to resolve the issue. If I had not trusted the architect’s measurements and taken my own instead, I might have caught this earlier on and saved us some trouble.
It takes a very long time, and it’s quite exhausting, but it is wildly important that it’s done fully and correctly at the beginning of the project.
Mapping Out the Electric
You’ll see on the floor plan here in purple all of the outlets in the condo:

That little circle with the two lines through it denotes an outlet. The S with a line through it means there is a switch located on that wall.
When we do a full gut renovation most of this stuff will end up getting ripped out and moved. Even then, it is helpful to know where things are located.
For projects with only furniture, it is important to know where the outlets are so we can avoid blocking them. If we do end up blocking them with something large, like a sectional sofa, then we can at least plan for this and come up with a creative solution to keep that outlet useful.
Switches can interfere with the best laid plans, from mounting a television to putting up moldings or hanging artwork. We can also determine if a switch is in an inconvenient position and might need to be moved for practical reasons. If we are installing new lighting in the walls or ceiling, it is sometimes possible to use an existing switch rather than wiring a new one.
Light Fixtures and Other Ceiling Elements
For a large scale design project, it is typical for the architect or designer to create a Reflected Ceiling Plan. This can show everything on the ceiling, from vents and smoke detectors to light fixtures and decorative treatments. It is also used to identify which light fixtures should be connected to which switch. For me, the need for this varies from project to project.
In this case study, I only needed to know the size and locations of the existing light fixtures, bathroom vents, and one beam that runs across the dining area. There is also a little shelf over the peninsula in the kitchen. The ceiling elements are indicated in blue. You’ll see I also include the ceiling heights for each space.
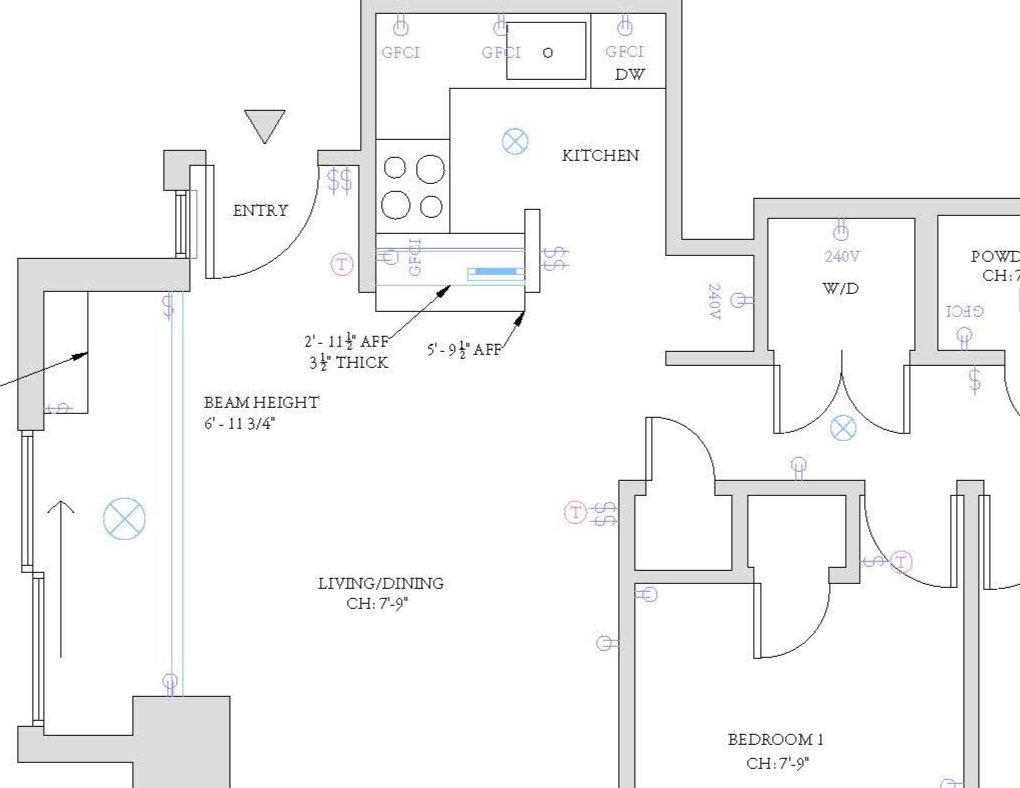
BTW - AFF means “Above Finished Floor”. It’s the standard for measuring how high on the wall something is/should be.
Thermostats and Heating Outlets
Whether your heat comes from the baseboards, a wall unit, floor vents, or wall vents, it’s vital that we understand where it is placed around the home. Of course, like anything else, these units can be moved, but it can be very costly. On a budget conscious project, we will plan around the existing heating/duct system to avoid the fees associated with changing and moving them.
For furniture only projects, we want to make sure we aren’t blocking your heat. It can damage furniture, it will keep your room from heating up properly, and in some cases it can become a fire hazard.
In the case study project, I indicate the location of thermostats with the letter T and a circle around it. The baseboard heaters are in grey along the walls.

We are actually removing the baseboard heating in this project, as the owners have another source of heat. So those grey lines will be removed!
What To Expect
I use a combination of a 25’ tape measure and a laser measure to get the most accurate results. I’ve found the best way to ensure that things are correct the first time is to draw up the plan on my laptop as I go (in AutoCAD). That way, if anything doesn’t line up, I’m still at the site to fix it. This takes longer on site, but could save us lots of time moving forward.
I often bring along my husband, Ben, to help me out. This makes the process move much faster and in this day and age, it’s always good to have backup when entering a stranger’s home. No offense! All of my clients have been lovely, but you never know when someone wants to keep you in their basement until they’re locking the door behind you.
How Long Does It Take?
For a 2,000 square foot space, it can take anywhere from 4-7 hours to survey the entire thing. For a large living room or a couple of adjoining rooms, it can be done in 20-60 minutes. Some projects do not need the same level of detail as others, some need more. Older homes tend to have crazy conditions and lots of bends and corners that take much longer to measure.
It may be an annoying part of the process, but it really is worth it.